Integrating GIFT with an external LTI Tool Consumer
- Integrating GIFT with an external LTI Tool Consumer
- LTI Information
- Supported Tool Consumers
- Integrating GIFT with edX
- Instructor Options for Creating an Embedded GIFT Course
- Option 1 (Instructor Role): Embedding a GIFT course (NO GIFT data collection)
- Option 2 (Instructor Role): Embedding a GIFT course with GIFT data collection
- Instructor Role: Setting Up LTI Scoring
- Student Role: Running an LTI Component from edX
This page is intended to help users with configuring an external Tool Consumer with GIFT for Learning Tools Interoperability (LTI). GIFT is compatible with the IMS Global Learning Tools Interoperability version 1.1.1 specification as an LTI Tool Provider. At a high level, this means that GIFT courses can be run from an LTI Tool Consumer that is compatible with the version 1.1.1 specification.
LTI Information
For more background information about what LTI is or how to develop for it, please see the following documentation:
Supported Tool Consumers
Currently GIFT is configured to work with edX (http://www.edx.org).
Integrating GIFT with edX
The following sections show how to configure edX to launch a GIFT course via the LTI specification.
In this configuration, edX is the Tool Consumer, and GIFT is the Tool Provider. This configuration allows a student from edX to connect and start a GIFT course while staying in the edX environment. An instructor in edX would need to configure the edX course by adding the LTI Component in edX.
Instructor Options for Creating an Embedded GIFT Course
When using GIFT as an LTI Tool Provider, instructors have 2 options for creating an embedded GIFT course:
- Option 1: Embed the GIFT course for participants to simply run the course (No GIFT data collection)
- Use this option if you simply want participants to run the GIFT course from the external Tool Consumer (such as edX). In this configuration, GIFT will not provide any reports for the participants for the course.
- Option 2: Embed the GIFT course for participants where GIFT data can be downloaded later on the participants of the course (Has GIFT data collection enabled)
- Use this option if you want to collect GIFT data on the participants who ran the course from an external Tool Consumer (such as edX).
Option 1 (Instructor Role): Embedding a GIFT course (NO GIFT data collection)
Set up the edX Course
An instructor will need to create an edX Course with an LTI Component that is configured to communicate with GIFT.
Prerequisites
Before beginning, the instructor will need to have the following:
- An account within edX that can develop courses (https://studio.edge.edx.org/home/).
- A created course within edX.
- Access to the GIFT instance such as GIFT Cloud (https://cloud.gifttutoring.org).
- A GIFT course that will be used to launch from edX.
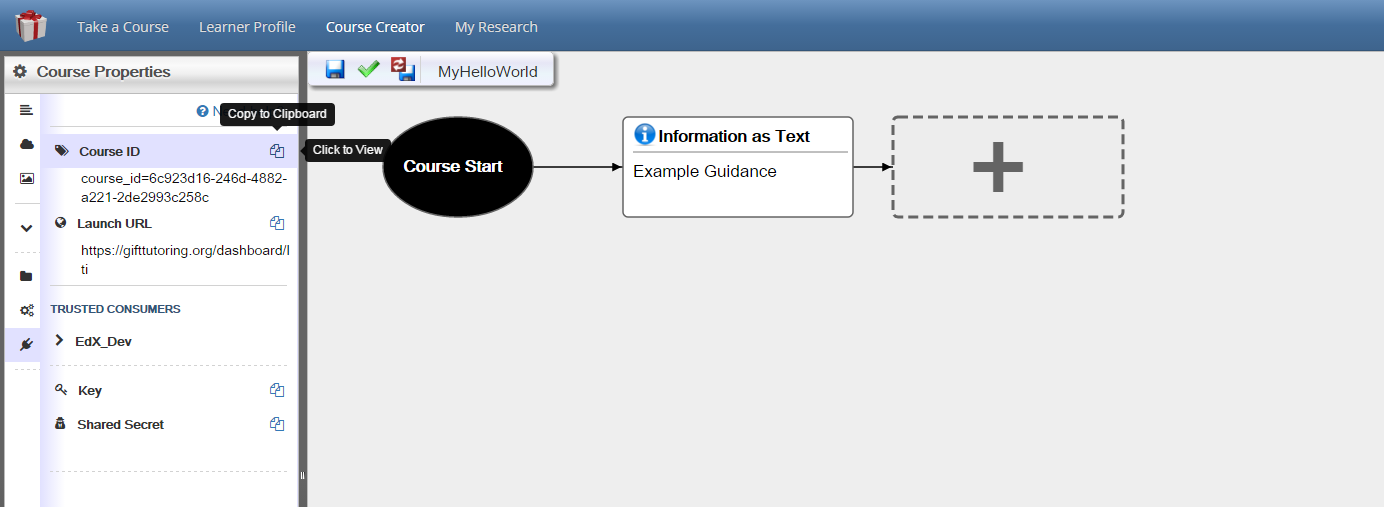
Get the LTI Parameters From GIFT (Course Creator)
The first thing to do as an instructor is to go into the GIFT course that you wish to launch from edX and get the LTI parameters. These parameters are found under the Course Properties in the Course Creator of GIFT. To do this:
- Log into the GIFT instance (such as https://cloud.gifttutoring.org).
- Select "Edit" (pencil icon) on a course you wish to get the LTI parameters for to load the Course Creator for the course.
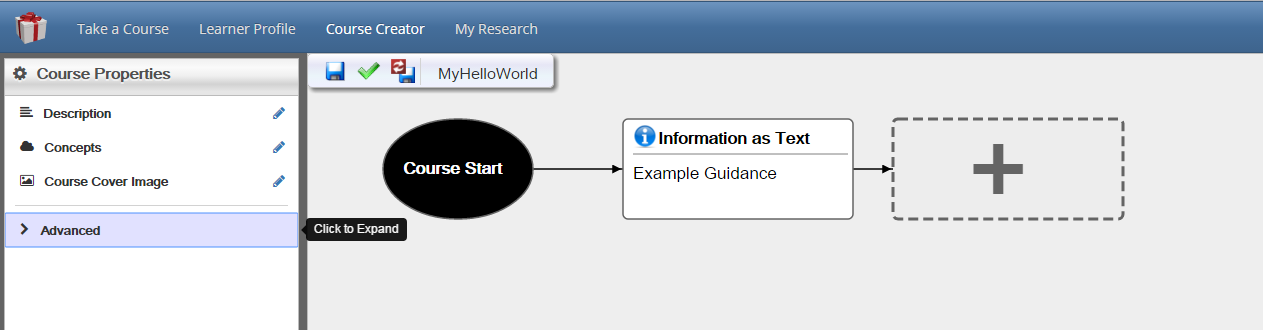
- Select Course Properties on the left panel and expand the Advanced section:
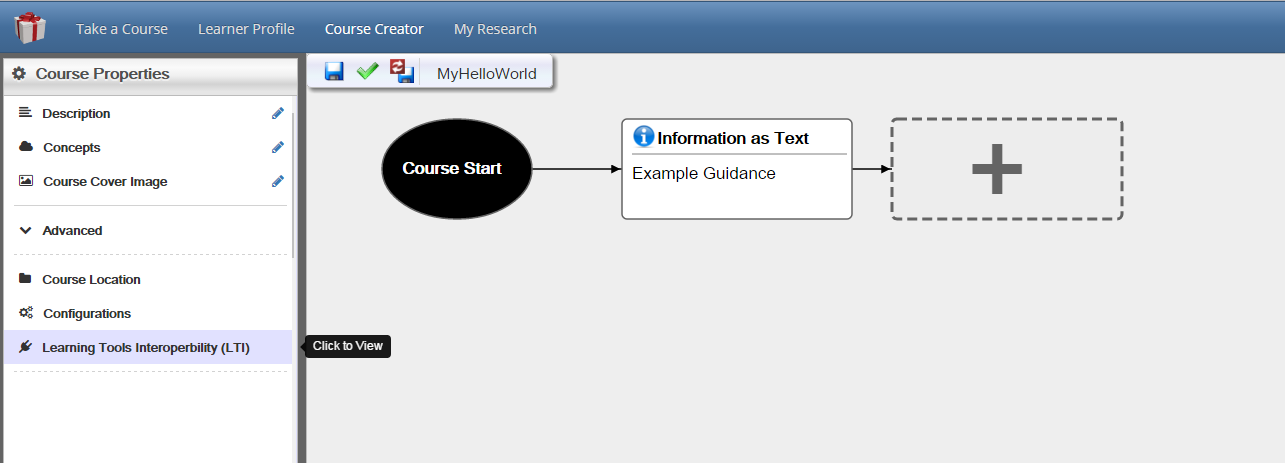
- Under Advanced select the Learning Tools Interoperability section:
- View the LTI parameters that will need to be copied into the edX course. The parameters are:
- Custom Parameters: Specifies the custom parameters used to specify things such as the course that will be launched from edX.
- Launch URL: Specifies the LTI Launch URL that will be used from edX.
- Key: The Consumer Key that identifies the Tool Consumer.
- Shared Secret: The Secret Token that is used to secure the request from edX. IMPORTANT! Do NOT share the Secret or post it publicly where other users/students can see it. It should only be copied into the edX course.
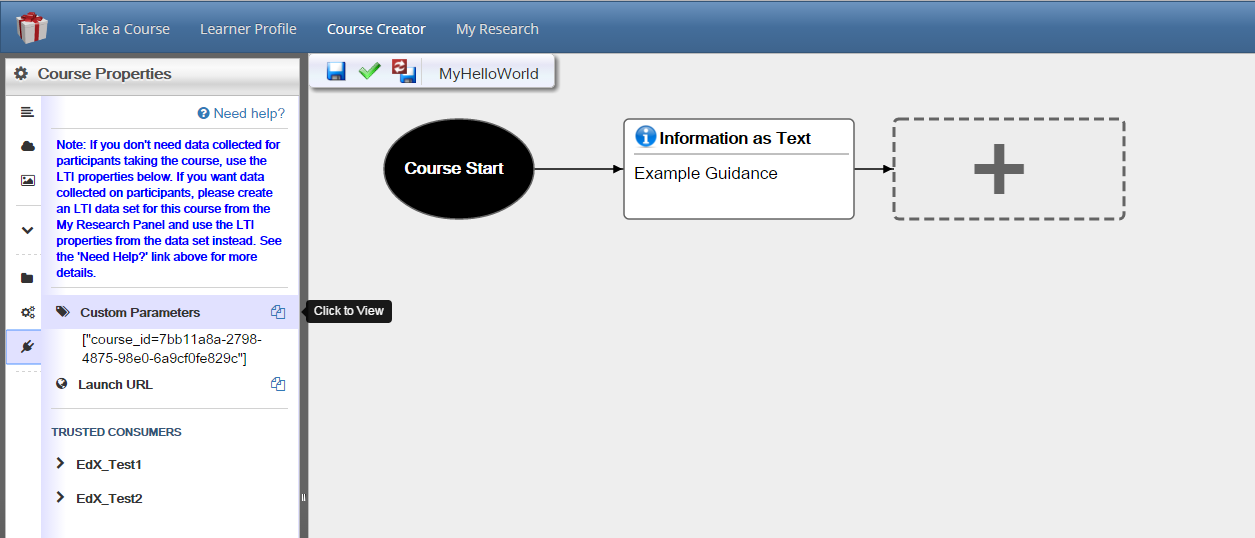
- You can use the "Copy" button to copy the text into edX rather than having to type it directly.
Embed the LTI parameters into an edX course
Once you have the LTI parameters from GIFT, the instructor can 'paste' the parameters into the edX course inside of the edX course creator (https://studio.edge.edx.org). To do this, do the following:
Create an LTI Passport in edX
- Open the course in edX course creator: https://studio.edge.edx.org
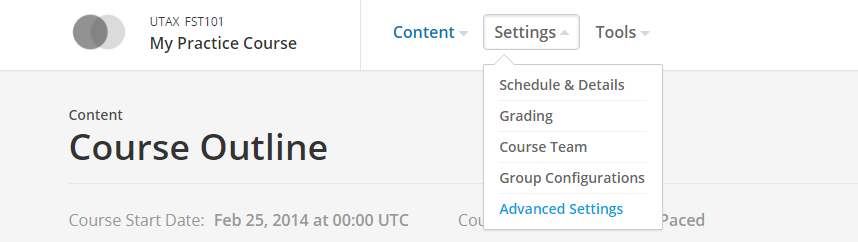
- Select Settings->Advanced Settings from the menu bar.
- Create an LTI Passport using the following format: "<id>:<key>:secret" where:
- id: Enter any text name that you want to use to identify the item ( for example "GIFT_LTI"). This name will be used later in edX to further configure the course in edX.
- key: Paste the key that was copied from the GIFT Course Creator.
- secret: Paste the Shared Secret that was copied from the GIFT Course Creator. IMPORTANT! Do NOT share the Secret or post it publicly where other users/students can see it. It should only be copied into the edX course as part of the LTI Passport. See the screenshot below. NOTE: the keys in the screenshots are not real keys in use.
[
    "GIFT_LTI:5c346913-26c1-460e-9a76-2c06c9ab2aa6:613cbce3-76e2-434b-854a-11dca78e388f"
]

Create and Edit a Unit in the edX Course
- Add a new unit in edX that will be used to launch GIFT.
- Select "Edit" from the edX Unit to edit the properties.
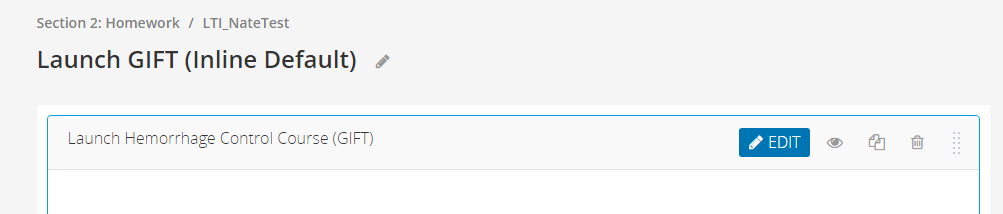
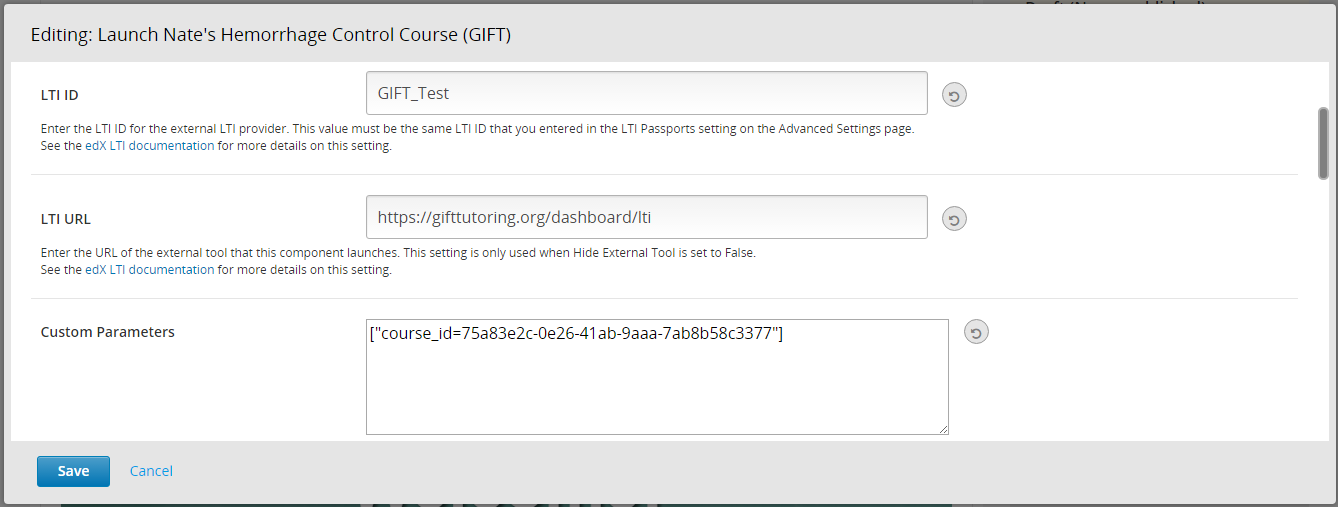
- Edit the following parameters:
- LTI ID: Insert the 'id' that was created in the LTI Passport. In the above example it would be "GIFT_LTI".
- LTI URL: Paste the Launch URL that was copied from the GIFT Course Creator.
- Custom Parameters: Insert the Custom Parameters that was copied from the GIFT Course Creator. Note that in edX the format of the custom parameters would look like the following:
["course_id=6c923d16-246d-4882-a221-2de2993c258c"]
- There are different ways the LTI component can be configured (launch in an IFrame vs Internal vs Modal). For more information on the LTI parameters available from edX, see the following documentation: http://edx.readthedocs.io/projects/edx-partner-course-staff/en/latest/exercises_tools/lti_component.html
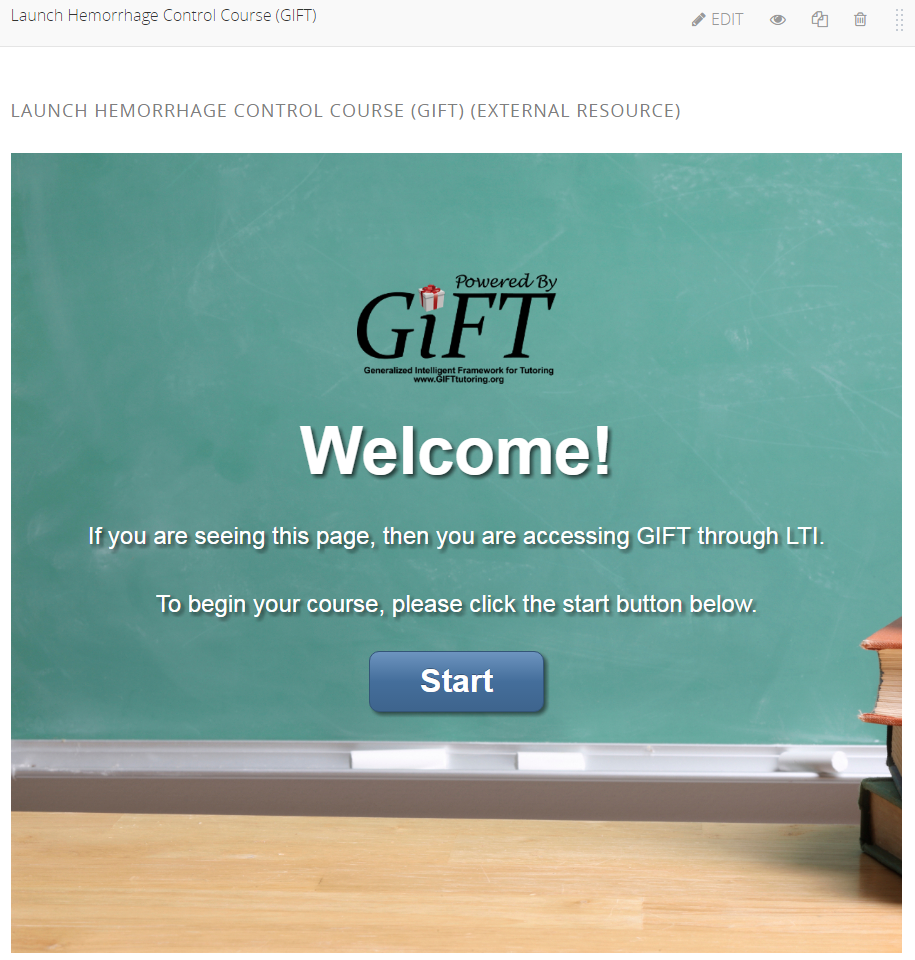
- At this point, the LTI component in edX should render the welcome page for your course that should look like this:
Option 2 (Instructor Role): Embedding a GIFT course with GIFT data collection
In this configuration, an instructor is able to collect and build reports of the participants. In order to use this, there's a few simple steps:
- Setup the edX course.
- Create the GIFT course.
- Create an LTI Data Set (from the GIFT My Research Panel) for the course.
- Embed the LTI parameters into an edX course.
- Collect Data on the participants from GIFT.
Set up the edX Course
An instructor will need to create an edX Course with an LTI Component that is configured to communicate with GIFT.
Prerequisites
Before beginning, the instructor will need to have the following:
- An account within edX that can develop courses (https://studio.edge.edx.org/home/).
- A created course within edX.
- Access to the GIFT instance such as GIFT Cloud (https://cloud.gifttutoring.org).
- A GIFT course that will be used to launch from edX.
- !!!IMPORTANT!!! An instructor must have permissions to edit the course to create a data set for the course and collect data for it.
Create the GIFT course
Use the GIFT Course Creator to create a GIFT course that will be embedded.
Create an LTI Data Set for the Course (My Research Panel)
A "Data Set" in GIFT is a grouping of data collection results that are tied to a specific course. GIFT supports 2 types of Data Sets (LTI or Experiments). In this case, you will create an LTI Data Set. Each GIFT Course you make can have multiple data sets created for it. A typical use case may involve embedding a single GIFT course into a single edX course, but more advanced options such as having multiple data sets for a single course could be applied if needed. This would help an instructor to differentiate the data of a GIFT course between various places that the GIFT course could be launched (either from different edX courses, or from multiple links within the same edX course).
Create a New LTI Data Set
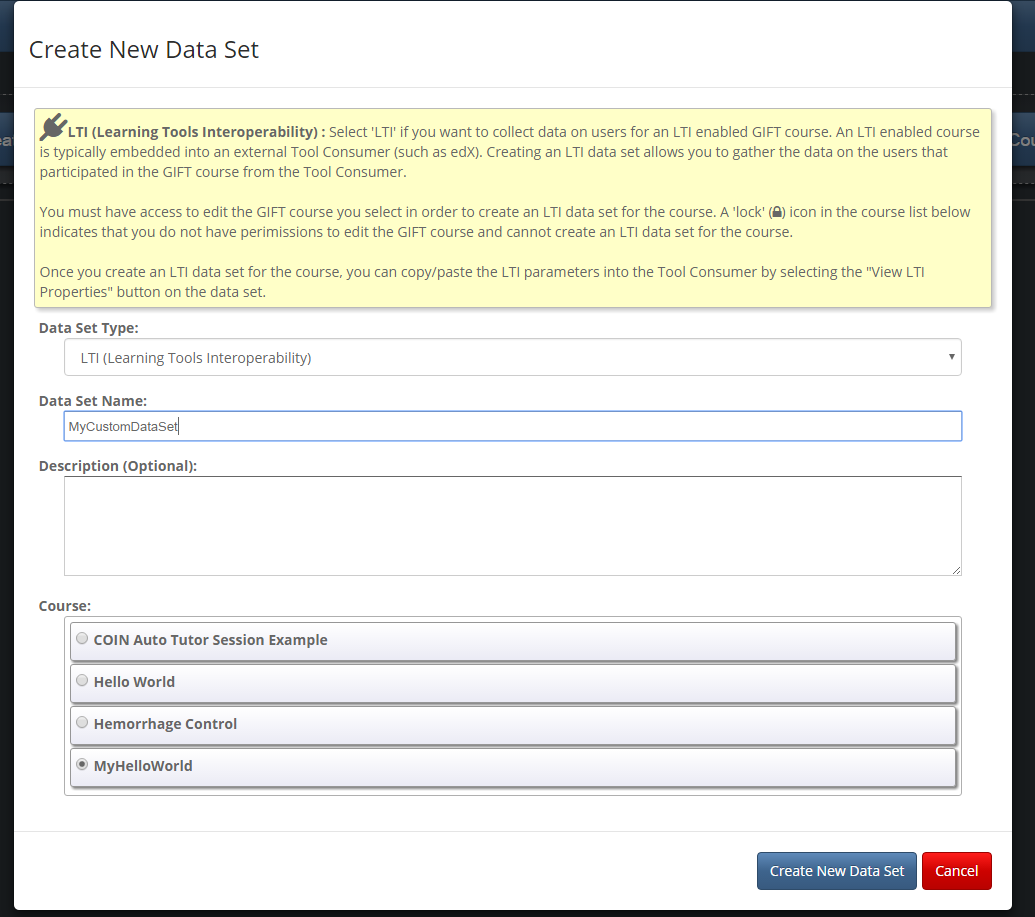
Once the GIFT course is created, you will need to create an LTI data set for the GIFT course. Navigate to the "My Research" panel to create a new data set.

Select "Create New Data Set Button" and a dialog will be presented. Make sure to select the "LTI" data set type, give it a name, description and select the course that you want embedded.
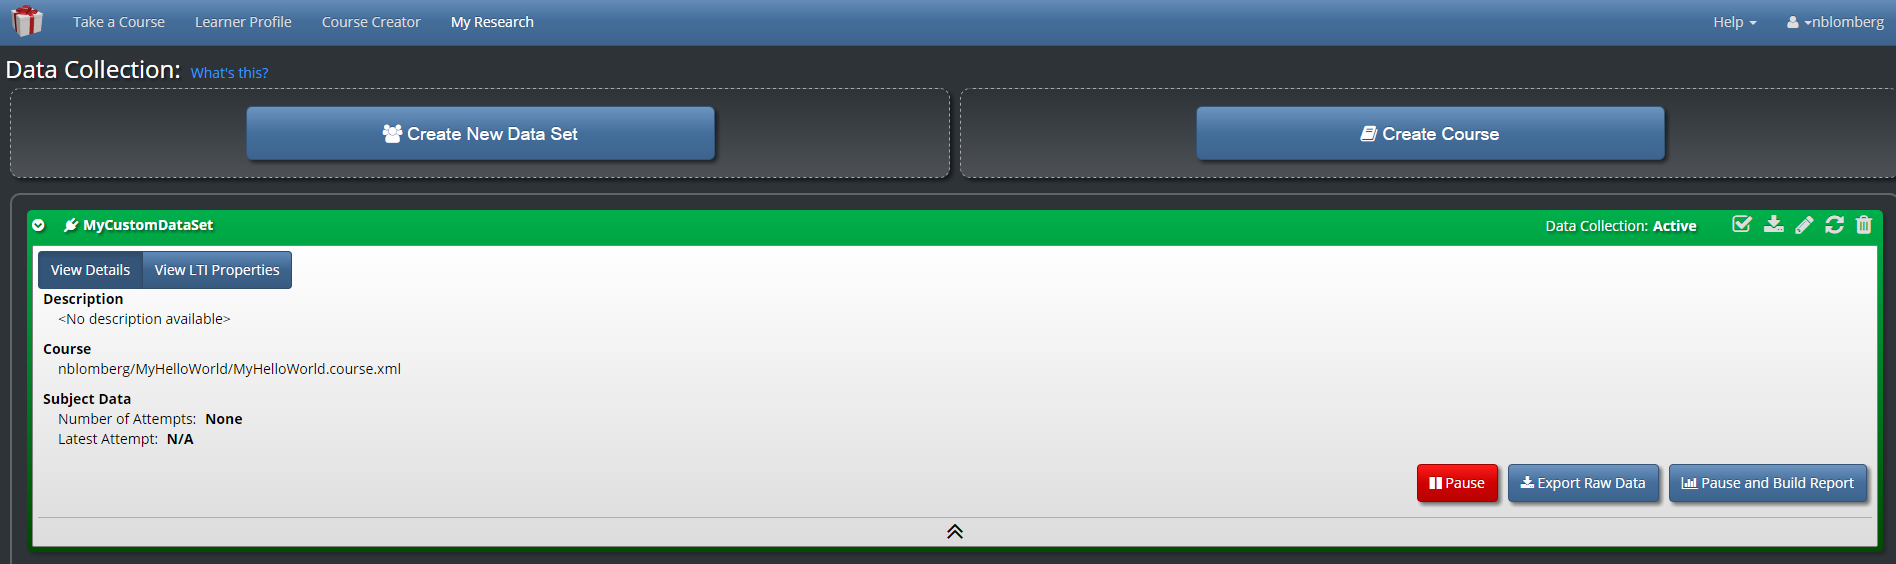
Once the data set is created, you will see the data set listed similar to below:
Copy the LTI parameters into edX
From the data set panel, select "View LTI Properties" to get the LTI properties that will need to be copied into Edx:
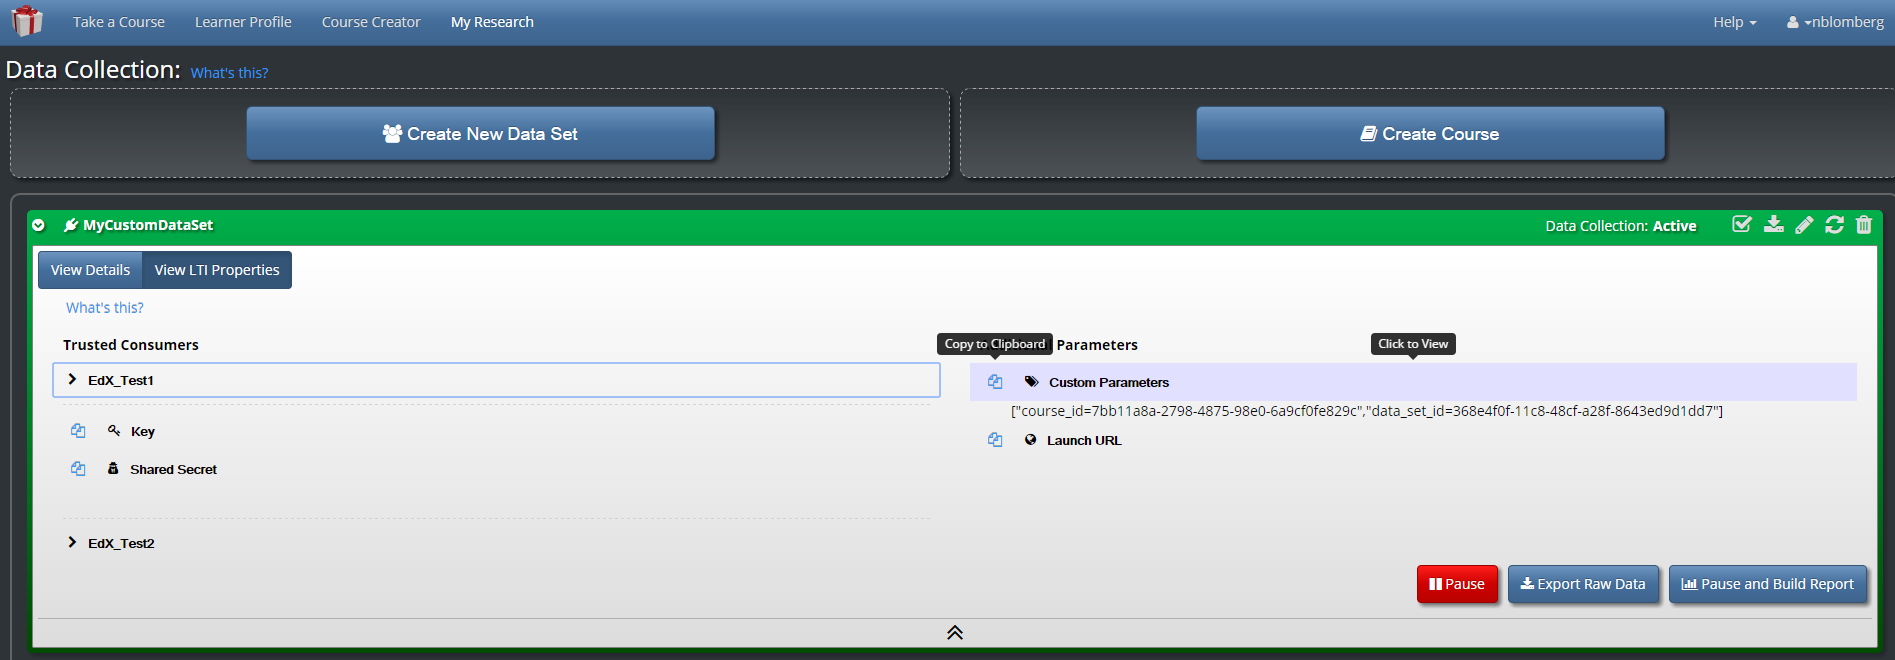
- View the LTI parameters that will need to be copied into the edX course. The parameters are:
- Custom Parameters: Specifies the custom parameters used to specify things such as the course that will be launched from edX.
- Launch URL: Specifies the LTI Launch URL that will be used from edX.
- Key: The Consumer Key that identifies the Tool Consumer.
- Shared Secret: The Secret Token that is used to secure the request from edX. IMPORTANT! Do NOT share the Secret or post it publicly where other users/students can see it. It should only be copied into the edX course.
- You can use the "Copy" button to copy the text into edX rather than having to type it directly.
Embed the LTI parameters into an edX course
Once you have the LTI parameters from GIFT, the instructor can 'paste' the parameters into the edX course inside of the edX course creator (https://studio.edge.edx.org). To do this, do the following:
Create an LTI Passport in edX
- Open the course in edX course creator: https://studio.edge.edx.org
- Select Settings->Advanced Settings from the menu bar.
- Create an LTI Passport using the following format: "<id>:<key>:secret" where:
- id: Enter any text name that you want to use to identify the item ( for example "GIFT_LTI"). This name will be used later in edX to further configure the course in edX.
- key: Paste the key that was copied from the GIFT Course Creator.
- secret: Paste the Shared Secret that was copied from the GIFT Course Creator. IMPORTANT! Do NOT share the Secret or post it publicly where other users/students can see it. It should only be copied into the edX course as part of the LTI Passport. See the screenshot below. NOTE: the keys in the screenshots are not real keys in use.
[
    "GIFT_LTI:5c346913-26c1-460e-9a76-2c06c9ab2aa6:613cbce3-76e2-434b-854a-11dca78e388f"
]
Create and Edit a Unit in the edX Course
- Add a new unit in edX that will be used to launch GIFT.
- Select "Edit" from the edX Unit to edit the properties.
- Edit the following parameters:
- LTI ID: Insert the 'id' that was created in the LTI Passport. In the above example it would be "GIFT_LTI".
- LTI URL: Paste the Launch URL that was copied from the GIFT Course Creator.
- Custom Parameters: Insert the Custom Parameters that was copied from the GIFT Course Creator. Note that in edX the format of the custom parameters would look like the following:
["course_id=7bb11a8a-2798-4875-98e0-6a9cf0fe829c","data_set_id=368e4f0f-11c8-48cf-a28f-8643ed9d1dd7"]
- There are different ways the LTI component can be configured (launch in an IFrame vs Internal vs Modal). For more information on the LTI parameters available from edX, see the following documentation: http://edx.readthedocs.io/projects/edx-partner-course-staff/en/latest/exercises_tools/lti_component.html
- At this point, the LTI component in edX should render the welcome page for your course that should look like this:
Managing the Data Set
The Instructor can update the details of the data set once it has been created. The data set name, description can be updated at anytime. Additionally, the instructor can 'pause' data collection which prevents participants from taking the course.
Collecting Reports from the Data Set
Once there have been participants that have taken the course, the instructor can go back to the Data Set to view metrics such as "Number of Attempts" on the data set. From here, the course can be exported, the raw data of participants can be exported OR a *.csv report file can be generated from the participants.

Export the Course
If needed, the Data Set panel allows the instructor to export the course that was used by the participants. Select the Export Course button from the Data Set panel.
Export Raw Data
Use the "Export Raw Data" button to download a *.zip file containing all of the GIFT logs for each participant that took the course.
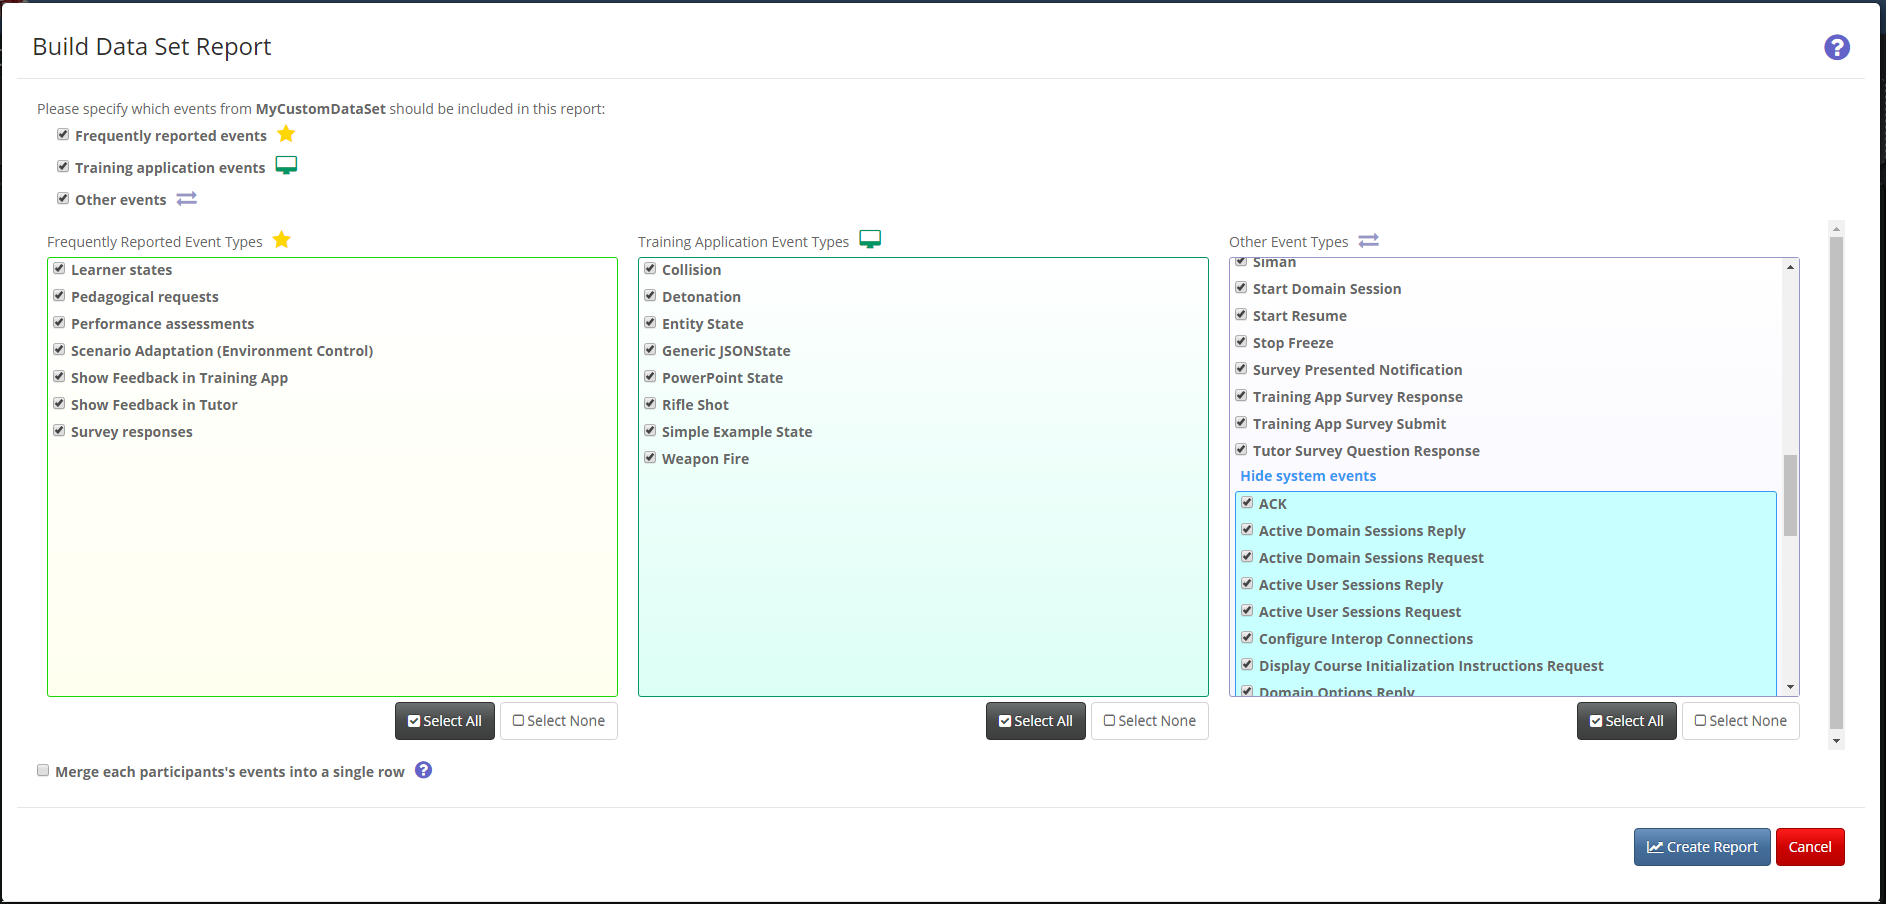
Build Report
Use the "Build Report" button to generate a report of the participant data with the GIFT messages that the instructor may be interested in. The report will be a *.CSV (comma separated format). This file can be imported into many applications such as Microsoft Excel for further analysis.
Modifying the GIFT course
IMPORTANT
Once you have created a Data Set, the instructor CAN make changes to the original GIFT course, but keep in mind that any changes to the course could invalidate any data collection results that were gathered before the changes were made. It is up to the instructor's discretion to be careful when making changes to the GIFT course once there is one or more data sets created for that course.
If in doubt, an instructor can always create a copy of the course to modify, or delete any unnecessary data sets that may no longer be needed (after data has been collected).
Instructor Role: Setting Up LTI Scoring
GIFT Score (LTI Outcomes)
GIFT as a Tool Provider allows for reporting a "score" back to the Tool Consumer (if the Tool Consumer provides) via the LTI Outcomes service. The score is a value from 0.0 to 1.0 that represents the user's progress through the GIFT course. A score of 1.0 means 100% completion of the course. The score represents the progress through each GIFT course object for the course. As an example, an EMAP course object counts as a single transition object. So if the GIFT course is authored with 10 course objects, and the learner only completes the first two objects, the score value would be 2/10 which would be 0.2. At this time, each time the user takes the course, the score value gets updated (based on the LTI specification). So if an LTI user completes a course one time, and gets 0.5, and then completes it a second time and gets a 1.0, the latest value is reflected in the Tool Consumer scorebook.
Setting Up Scoring
To setup scoring in edX, the lesson needs to be set as "homework" and the unit must be set to "scored" in order for the score to be seen. Once this is set, and the students start taking the course, the score should be reported back to edX from GIFT which can be viewed (see next section).
View the Scoring
To view the scoring in edX, the instructor can navigate to the learner's "Progress" tab for the course. The instructor can also view the overall progress for each student in edX.
Student Role: Running an LTI Component from edX
As a student, there should be nothing to configure except start the edX course from the instructor.
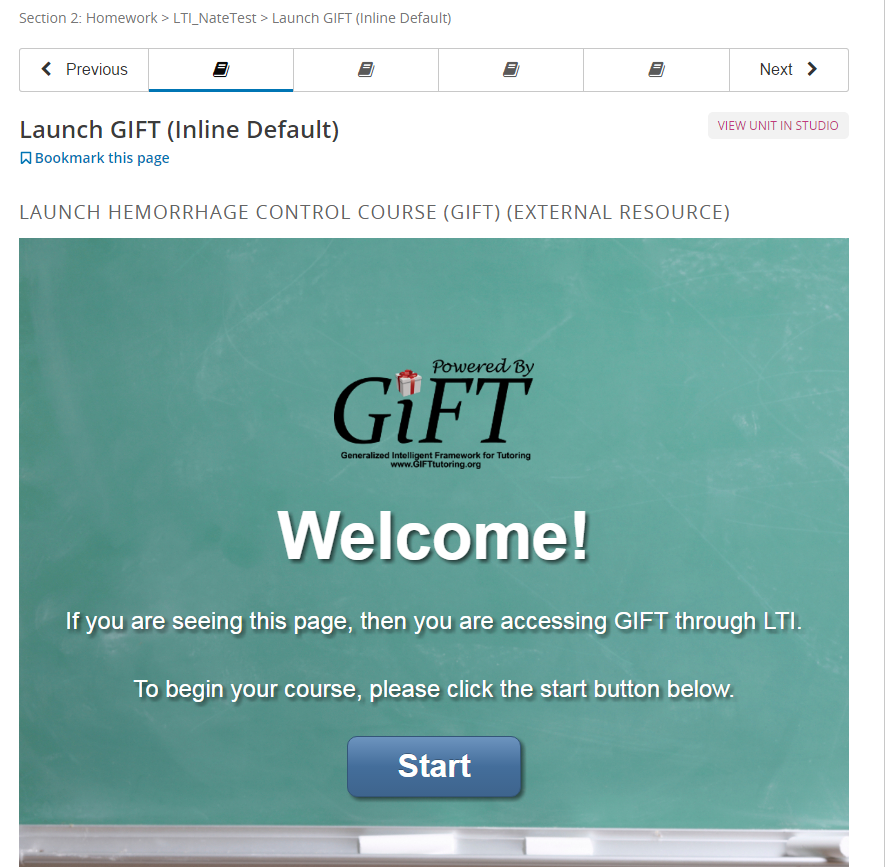
- When coming to an LTI component in edX, the GIFT 'Welcome' Page should be the first page seen:
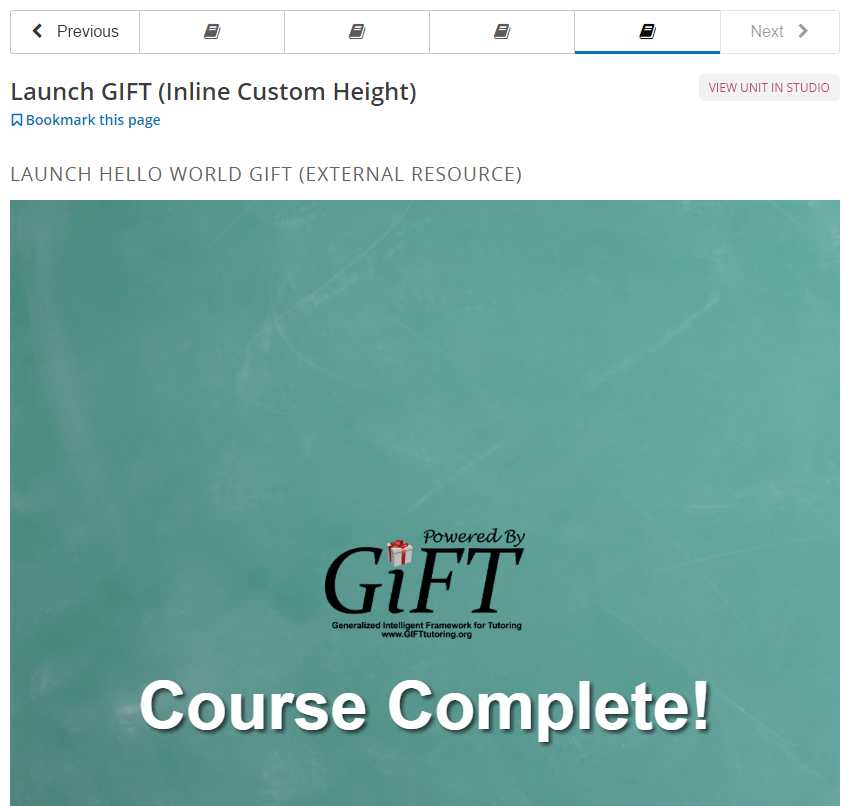
- After the course is taken, the user should see the 'Complete' Page, which looks like this: